
What Happens During a Septic System Inspection: A Home Inspector’s Guide
- Justin Birtwell
- Nov 28, 2025
- 6 min read

Updated: Jan 24
As a home inspector in Connecticut, I’ve seen countless homeowners and buyers navigate the complexities of septic systems—often with a mix of curiosity and concern. Unlike municipal sewer systems, septic systems are self-contained, requiring regular maintenance and periodic inspections to ensure they function properly. A septic system inspection is a critical step, whether you’re buying a home, selling one, or simply maintaining your property. In this blog post, I’ll walk you through exactly what happens during a septic inspection, based on industry standards, my own field experience, and practical insights. By the end, you’ll know what to expect, why it matters, and how to prepare. Let’s dive in!
Why Septic Inspections Matter
Before we get into the process, let’s cover why septic inspections are so important. A septic system handles your household’s wastewater, treating and disposing of it underground. If it fails, you could face backups, foul odors, soggy yards, or costly repairs—think $10,000 to $50,000 for a full replacement. According to the Environmental Protection Agency (EPA), over 20% of U.S. households rely on septic systems, and in rural areas like parts of Connecticut, they’re the norm.
Inspections catch issues early, protect property value, and ensure compliance with local health codes. For buyers, they’re a safeguard against inheriting a failing system. For sellers, a clean inspection report can boost buyer confidence. Typically, systems should be inspected every 3–5 years or during real estate transactions, per the National Onsite Wastewater Recycling Association (NOWRA).
Step-by-Step: What Happens During a Septic Inspection
A professional septic inspection provided bya a septic contractor or certified home inspector, is a thorough evaluation of the system’s components and performance. It’s not just a quick glance—it can take 1–3 hours, depending on the system’s complexity and condition. Here’s the detailed process, broken down into key stages.
1. Pre-Inspection Preparation
Before the inspector arrives, they’ll gather background information:
System Records: The inspector may ask for permits, installation records, or past maintenance reports (e.g., pumping history). In Connecticut, the Department of Public Health and local health departments often maintain these records.
Homeowner Input: You’ll be asked about usage patterns (e.g., number of residents, water-intensive appliances) and any issues like slow drains, odors, or wet spots in the yard.
Site Review: The inspector confirms the system’s location using property plans or visual cues (e.g., tank access lids, drainfield outline). If records are missing, they may use a probe to locate the tank.
Pro Tip: Have your tank pumped before the inspection if it hasn’t been done in the last 3–5 years. This allows a clearer view of the tank’s interior and avoids delays.
2. Locating and Accessing the Septic Tank
The inspection begins with the septic tank, the underground chamber where wastewater first collects. Here’s what happens:
Digging to Access: The inspector locates the tank’s access lids (usually 6–18 inches underground) and digs to expose them. Some modern tanks have risers for easier access. Some inspectors will inquire with the town building department for a "As-Built" diagram showing the location of the tank.
Visual Check: With lids open, the inspector examines the tank’s exterior for cracks, corrosion (in concrete or steel tanks), or root intrusion. They’ll also check the inlet and outlet pipes for blockages.
Water Level Assessment: Normal water levels should be at or below the outlet pipe. High levels suggest a clog or drainfield failure, while low levels might indicate a leak.
In my inspections, I’ve found tanks with cracked lids or rusted baffles (internal dividers), which can let solids escape and clog the drainfield. These issues often cost $500–$2,000 to fix if caught early.

3. Evaluating Tank Condition and Components
Inside the tank, the inspector checks:
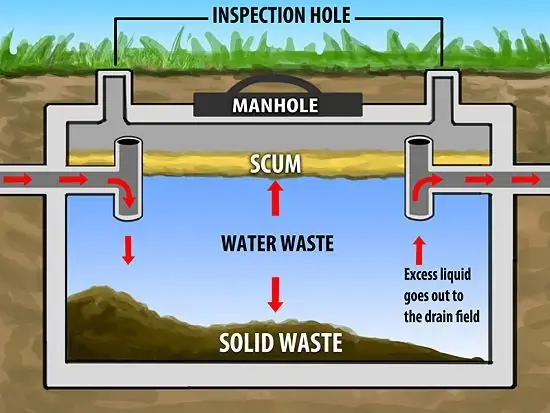
Sludge and Scum Layers: Wastewater separates into scum (floating grease/oils), liquid effluent, and sludge (settled solids). The inspector measures these layers with a sludge judge (a long pole) to ensure the tank isn’t overdue for pumping. A tank is considered “full” when sludge/scum occupy too much space, risking solids entering the drainfield.
Baffles and Tees: These components prevent solids from exiting the tank. The inspector ensures they’re intact and not clogged or deteriorated.
Structural Integrity: Concrete tanks can crack from soil pressure; fiberglass or plastic tanks may deform. Any damage flags a repair need.
Fun Fact: A typical 1,000-gallon tank for a 3-bedroom home can handle about 300 gallons of daily wastewater. Overloading it with heavy laundry days or houseguests can strain the system.
4. Inspecting the Drainfield (Leach Field)
The drainfield, where effluent is dispersed into the soil, is the system’s workhorse. This step is critical because drainfield failure is the most expensive to fix. The inspector:
Locates the Field: Using plans or probes, they identify the drainfield’s layout—typically a series of perforated pipes in gravel trenches or chambers.
Checks for Saturation: Wet, soggy soil or lush grass over the drainfield indicates poor drainage or failure. The inspector may dig small test holes to assess soil absorption.
Looks for Backups: They check for effluent surfacing or pooling, a sign of clogging or oversaturation.
Assesses Vegetation: Tree roots can invade pipes, so the inspector notes nearby trees or shrubs.
In Connecticut, where clay soils are common, drainfields must be carefully designed to handle slower percolation. I once inspected a home in Litchfield County where a saturated drainfield caused sewage to bubble up—a $20,000 repair for the buyer who skipped the inspection.
5. Optional Hydraulic Load Test (if Required)
For real estate transactions or suspected issues, some inspectors perform a hydraulic load test:
Process: They run a large volume of water (e.g., 100–200 gallons) through the system, often by filling bathtubs or running faucets, to simulate heavy use.
Observation: The inspector monitors water levels in the tank and drainfield for backups or slow drainage, which could indicate capacity issues.
This test isn’t always standard, as it can stress older systems, but it’s valuable for high-risk properties.
6. Checking Additional Components
Modern septic systems may include extras like:
Pumps or Lift Stations: For homes on sloped lots, pumps move effluent to the drainfield. The inspector tests the pump’s operation and alarms.
Filters: Effluent filters trap solids; they’re checked for clogs.
Alternative Systems: In Connecticut, some homes use advanced systems (e.g., mound or aerobic systems) for poor soil conditions. These require specialized checks, like aerator function or sand filter condition.
After the inspection, you’ll receive a detailed report, typically including:
Findings: Tank condition, sludge levels, drainfield performance, and any defects (e.g., cracked tank, clogged pipes).
Maintenance Needs: Recommendations like pumping, baffle repairs, or tree removal.
Red Flags: Major issues like drainfield failure or non-compliance with Connecticut’s septic regulations (e.g., Title 19-13-B103 of the state health code).
Photos: Visual evidence of key components or problems.
The inspector may recommend immediate repairs, further evaluation (e.g., camera scoping of pipes), or routine maintenance like pumping every 3 years.
What to Expect After the Inspection
Pass: A well-maintained system with no major issues is ready for continued use. Follow maintenance tips like conserving water and avoiding flushing non-degradable items (e.g., wipes, grease).
Minor Issues: Cracked lids or clogged filters might cost $200–$1,000 to fix.
Major Issues: Drainfield failure or a cracked tank could require replacement, costing $10,000–$50,000. Buyers may negotiate repairs with sellers.
Health Code Violations: In Connecticut, failing systems must be repaired to meet local health department standards, often before a sale.
Tips to Prepare for Your Septic Inspection
Locate Records: Gather any septic plans or pumping receipts.
Clear Access: Mark or uncover tank lids to save time (but don’t open them yourself—leave that to pros).
Avoid Heavy Water Use: Don’t run the dishwasher or laundry the day of the inspection to avoid skewing results.
Hire a Pro: Choose a licensed septic inspector or contractor familiar with Connecticut’s regulations. The Connecticut Onsite Wastewater Recycling Association (COWRA) lists certified professionals.
Why It’s Worth It
A septic inspection might cost $300–$600, but it’s a small price compared to the thousands you could spend on repairs. As an inspector, I’ve seen buyers avoid disasters by catching failing systems before closing—and sellers boost their home’s value with a clean report. Regular inspections also protect your property and the environment, preventing groundwater contamination, a big concern in Connecticut’s rural communities.
Final Thoughts
A septic system inspection is a deep dive into your home’s wastewater lifeline, covering the tank, drainfield, and beyond. It’s a blend of detective work and technical skill, designed to keep your system running smoothly and your wallet intact. Whether you’re in Fairfield, Hartford, or Litchfield County, understanding this process empowers you to make informed decisions.
Got a septic inspection coming up or noticing slow drains? Share your questions below or contact a local pro to schedule yours. Stay proactive, and your septic system will thank you!
Maxim Home Inspections offers many types of inspections near Newtown CT (western Connecticut service area) including local home inspections, radon testing, mold inspections, termite inspections, , septic inspections and well inspections just to name a few. . If you'd like to have your home inspected you can get a quote an even schedule a home inspection with me you local home inspector.


Comments